


웹 개발 종합반 1주차 - HTML, CSS, Bootstrap으로 추억앨범 만들기 1
웹 개발 종합반 1주차 TIL - 구글 폰트와 부트스트랩 잘 가져다 사용하기웹 개발 종합반 1주차 TIL - CSS 기초웹 개발 종합반 1주차 TIL - HTML 기초웹의 뼈대인 HTML😊 html은 웹페이지에서 뼈대를 담당
taejudevlog.tistory.com
☝️위의 글을 읽어보고 읽으면 이해가 됩니다!
추억앨범 포스팅 박스 만들기
✓ 지난 글에서 부트스트랩 카드를 추가해서 추억앨범 틀을 완성함

이제 Textarea 태그와 CSS를 이용해 추억앨범을 완성해보자
1. 우선 큰 박스 mypostingbox 클래스 div 만들기
- 박스 너비 정하기 - width : 500px ;
- 박스 바깥쪽으로 띄우기 - margin : 30px auto 30px auto ;
- 안쪽으로 띄우기 - padding : 20px 20px 20px 20px ;
- 그림자 효과 - box-shadow : 0px 0px 3px 0px #747474 ;
- 박스 모서리 둥글게 변경 - border-radius : 5px ;
<!doctype html>
<html lang="en">

<head>
    <meta charset="utf-8">
    <meta name="viewport" content="width=device-width, initial-scale=1, shrink-to-fit=no">

    <link href="https://cdn.jsdelivr.net/npm/bootstrap@5.0.2/dist/css/bootstrap.min.css" rel="stylesheet"
        integrity="sha384-EVSTQN3/azprG1Anm3QDgpJLIm9Nao0Yz1ztcQTwFspd3yD65VohhpuuCOmLASjC" crossorigin="anonymous">
    <script src="https://ajax.googleapis.com/ajax/libs/jquery/3.5.1/jquery.min.js"></script>
    <script src="https://cdn.jsdelivr.net/npm/bootstrap@5.0.2/dist/js/bootstrap.bundle.min.js"
        integrity="sha384-MrcW6ZMFYlzcLA8Nl+NtUVF0sA7MsXsP1UyJoMp4YLEuNSfAP+JcXn/tWtIaxVXM"
        crossorigin="anonymous"></script>

    <script src="https://code.jquery.com/jquery-3.2.1.slim.min.js"></script>
    <script src="https://cdnjs.cloudflare.com/ajax/libs/popper.js/1.12.9/umd/popper.min.js"></script>
    <script src="https://maxcdn.bootstrapcdn.com/bootstrap/4.0.0/js/bootstrap.min.js"></script>


    <title>My Album</title>
    <style>
        @import url('https://fonts.googleapis.com/css2?family=Gowun+Dodum&display=swap');

        * {
            font-family: 'Gowun Dodum', sans-serif;
        }

        .mytitle {
            background-color: green;
            color: white;

            height: 250px;

            /* 내용물을 정렬 */
            display: flex;
            flex-direction: column;
            align-items: center;
            justify-content: center;

            background-image: url('https://images.unsplash.com/photo-1511992243105-2992b3fd0410?ixlib=rb-4.0.3&ixid=M3wxMjA3fDB8MHxwaG90by1wYWdlfHx8fGVufDB8fHx8fA%3D%3D&auto=format&fit=crop&w=1470&q=80');
            background-position: center;
            background-size: cover;
        }

        .mytitle > button {
            width: 150px;
            height: 50px;
            background-color: transparent;
            border: none;
            color: white;
            font-size: 18px;
            font-weight: bold;
            border-radius: 5px;

            border: 1px solid white;
            margin-top: 20px;
        }

        .mycards {
            margin: 20px auto 20px auto;
            width: 1200px;
        }

        .mypostingbox {
            width: 500px;
            margin: 30px auto 30px auto;
            padding: 20px 20px 20px 20px;
            border-radius: 5px;
            box-shadow: 0px 0px 3px 0px #747474;
        }

    </style>
</head>

<body>
    <div class="mytitle">
        <h1>나만의 추억 앨범</h1>
        <button>추억 저장하기</button>
    </div>

    <div class="mypostingbox">
    </div>

</body>

</html>
2. 앨범 이미지, 앨범 제목, 앨범 날짜를 입력할 수 있는 input, Textarea 태그 사용하기
✓ 부트스트랩의 Forms 의 Floating Labels 와 Textareas 참고
Floating labels
Create beautifully simple form labels that float over your input fields.
getbootstrap.com

<div class="mypostingbox">
    <div class="form-floating mb-3">
        <input type="email" class="form-control" id="floatingInput" placeholder="name@example.com">
        <label for="floatingInput">앨범 이미지</label>
     </div>

    <div class="form-floating mb-3">
        <input type="email" class="form-control" id="floatingInput" placeholder="name@example.com">
        <label for="floatingInput">앨범 제목</label>
    </div>

    <div class="form-floating mb-3">
        <input type="email" class="form-control" id="floatingInput" placeholder="name@example.com">
        <label for="floatingInput">앨범 날짜</label>
    </div>

    <div class="form-floating">
        <textarea class="form-control" placeholder="Leave a comment here" id="floatingTextarea"></textarea>
        <label for="floatingTextarea">앨범 내용</label>
    </div>

    <div class="mybtn">
        <button type="button" class="btn btn-dark">기록하기</button>
        <button type="button" class="btn btn-outline-dark">닫기</button>
    </div>
</div>
3. 입력 폼 하단에 기록하기와 닫기 버튼 만들기
✓ 부트스트랩의 Buttons 의 Variants 참고
Buttons
Use Bootstrap’s custom button styles for actions in forms, dialogs, and more with support for multiple sizes, states, and more.
getbootstrap.com

전체 완성 모습과 코드
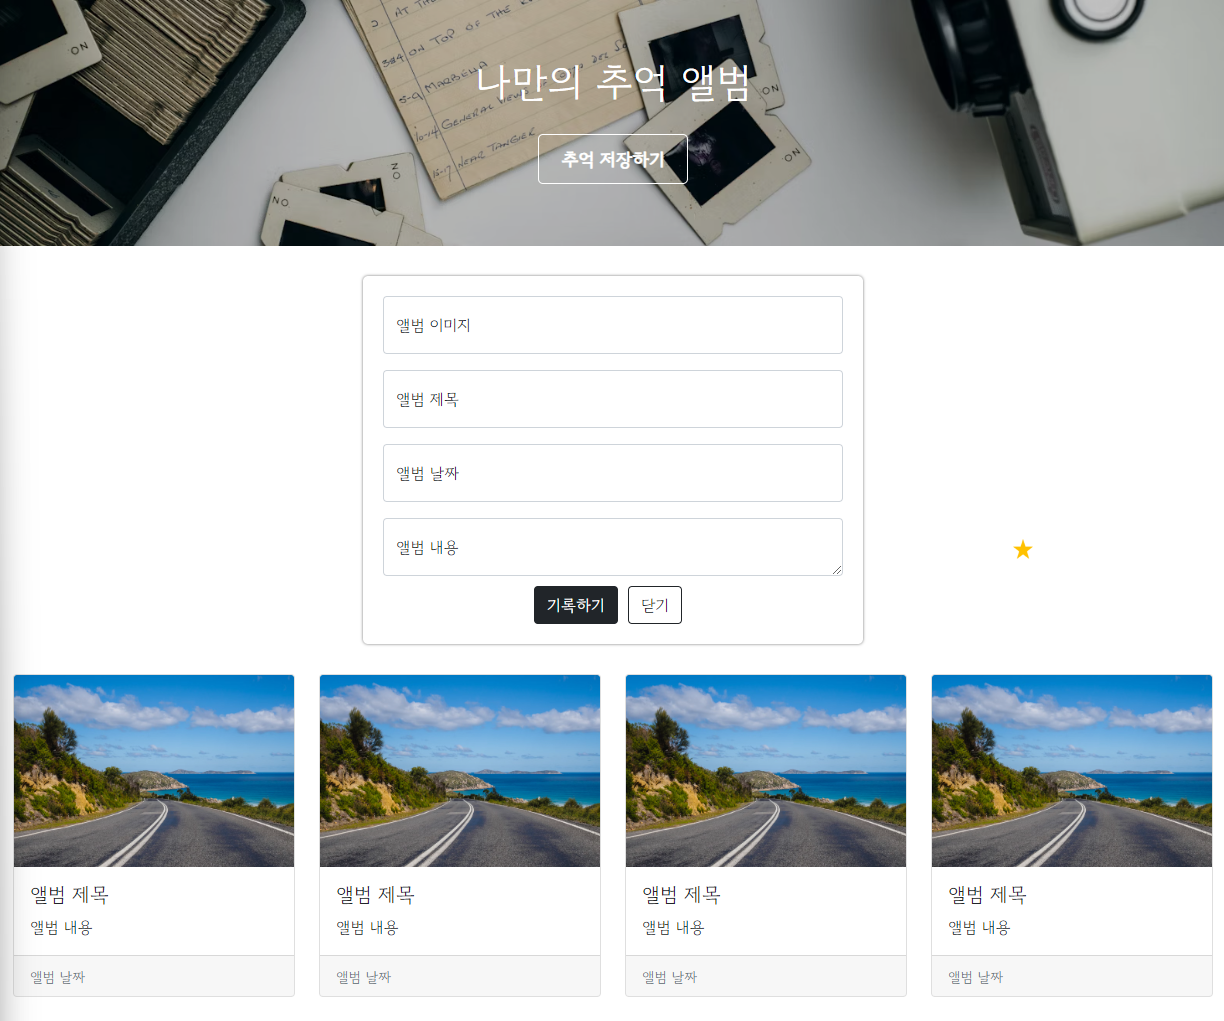
포스팅 박스 포함한 전체 코드 👇
<!DOCTYPE html>
<html lang="en">
  <head>
    <meta charset="utf-8" />
    <meta
      name="viewport"
      content="width=device-width, initial-scale=1, shrink-to-fit=no"
    />

    <link
      href="https://cdn.jsdelivr.net/npm/bootstrap@5.0.2/dist/css/bootstrap.min.css"
      rel="stylesheet"
      integrity="sha384-EVSTQN3/azprG1Anm3QDgpJLIm9Nao0Yz1ztcQTwFspd3yD65VohhpuuCOmLASjC"
      crossorigin="anonymous"
    />
    <script src="https://ajax.googleapis.com/ajax/libs/jquery/3.5.1/jquery.min.js"></script>
    <script
      src="https://cdn.jsdelivr.net/npm/bootstrap@5.0.2/dist/js/bootstrap.bundle.min.js"
      integrity="sha384-MrcW6ZMFYlzcLA8Nl+NtUVF0sA7MsXsP1UyJoMp4YLEuNSfAP+JcXn/tWtIaxVXM"
      crossorigin="anonymous"
    ></script>

    <title>My Album</title>
    <style>
      @import url("https://fonts.googleapis.com/css2?family=Gowun+Dodum&display=swap");

      * {
        font-family: "Gowun Dodum", sans-serif;
      }

      .mytitle {
        background-color: green;
        color: white;

        height: 250px;

        /* 내용물을 정렬 */
        display: flex;
        flex-direction: column;
        align-items: center;
        justify-content: center;

        background-image: linear-gradient(
            0deg,
            rgba(0, 0, 0, 0.2),
            rgba(0, 0, 0, 0.2)
          ),
          url("https://images.unsplash.com/photo-1511992243105-2992b3fd0410?ixlib=rb-4.0.3&ixid=M3wxMjA3fDB8MHxwaG90by1wYWdlfHx8fGVufDB8fHx8fA%3D%3D&auto=format&fit=crop&w=1470&q=80");
        background-position: center;
        background-size: cover;
      }

      .mytitle > button {
        width: 150px;
        height: 50px;
        background-color: transparent;
        border: none;
        color: white;
        font-size: 18px;
        font-weight: bold;
        border-radius: 5px;

        border: 1px solid white;
        margin-top: 20px;
      }

      .mypostingbox {
        width: 500px;
        margin: 30px auto 30px auto;
        padding: 20px;

        border-radius: 5px;
        box-shadow: 0px 0px 3px 0px #747474;
      }

      .mybtn {
        display: flex;
        flex-direction: row;
        align-items: center;
        justify-content: center;

        margin-top: 10px;
      }

      .mybtn > button {
        margin-right: 10px;
      }

      .mycards {
        margin: 20px auto 20px auto;
        width: 1200px;
      }
    </style>
  </head>

  <body>
    <div class="mytitle">
      <h1>나만의 추억 앨범</h1>
      <button>추억 저장하기</button>
    </div>
    <div class="mypostingbox">
      <div class="form-floating mb-3">
        <input
          type="email"
          class="form-control"
          id="floatingInput"
          placeholder="name@example.com"
        />
        <label for="floatingInput">앨범 이미지</label>
      </div>

      <div class="form-floating mb-3">
        <input
          type="email"
          class="form-control"
          id="floatingInput"
          placeholder="name@example.com"
        />
        <label for="floatingInput">앨범 제목</label>
      </div>

      <div class="form-floating mb-3">
        <input
          type="email"
          class="form-control"
          id="floatingInput"
          placeholder="name@example.com"
        />
        <label for="floatingInput">앨범 날짜</label>
      </div>

      <div class="form-floating">
        <textarea
          class="form-control"
          placeholder="Leave a comment here"
          id="floatingTextarea"
        ></textarea>
        <label for="floatingTextarea">앨범 내용</label>
      </div>

      <div class="mybtn">
        <button type="button" class="btn btn-dark">기록하기</button>
        <button type="button" class="btn btn-outline-dark">닫기</button>
      </div>
    </div>
    <div class="mycards">
      <div class="row row-cols-1 row-cols-md-4 g-4">
        <div class="col">
          <div class="card h-100">
            <img
              src="https://images.unsplash.com/photo-1446768500601-ac47e5ec3719?ixlib=rb-4.0.3&ixid=M3wxMjA3fDB8MHxwaG90by1wYWdlfHx8fGVufDB8fHx8fA%3D%3D&auto=format&fit=crop&w=1446&q=80"
              class="card-img-top"
              alt="..."
            />
            <div class="card-body">
              <h5 class="card-title">앨범 제목</h5>
              <p class="card-text">앨범 내용</p>
            </div>
            <div class="card-footer">
              <small class="text-muted">앨범 날짜</small>
            </div>
          </div>
        </div>
      </div>
    </div>
  </body>
</html>
다음 글부터는 웹 개발 종합반 2주차 자바스크립트, 제이쿼리를 이용해
넷플릭스 클론 프로젝트 진행 ! 😊
728x90
'내배캠_Java 6기 > 웹개발 종합반 강의' 카테고리의 다른 글
| 웹 개발 종합반 2주차 - 자바스크립트 개요와 기초 문법 (0) | 2024.07.05 |
|---|---|
| 웹 개발 종합반 2주차 - 1주차의 HTML, CSS, Bootstrap 복습 (0) | 2024.07.04 |
| 웹 개발 종합반 1주차 - HTML, CSS, Bootstrap으로 추억앨범 만들기 1 (0) | 2024.07.03 |
| 웹 개발 종합반 1주차 TIL - 구글 폰트와 부트스트랩 잘 가져다 사용하기 (0) | 2024.07.03 |
| 웹 개발 종합반 1주차 TIL - CSS 기초 (0) | 2024.07.03 |