
2주차 배울 것
💡 1주차에는 HTML 웹의 뼈대를 만들고 꾸몄다면 2주차에는 자바스크립트를 이용해 움직임을 추가해보자
클릭으로 사진이 바뀐다거나 스크롤을 내리면 사진이 변경되게 !
자바스크립트 배우기 전에 스파르타플릭스를 만들며 HTML, CSS, Bootstrap 복습해보기
✓ 복습은 넷플릭스 클론인 스파르타플릭스를 만들어보면서 진행
✓ 스파르타플릭스는 1주차 프로젝트인 추억앨범 만들기 프로젝트와 유사하기 때문에 다시 한번 읽어보기 추천 🐻❄️
👇
웹 개발 종합반 1주차 - HTML, CSS, Bootstrap으로 추억앨범 만들기 2
웹 개발 종합반 1주차 - HTML, CSS, Bootstrap으로 추억앨범 만들기 1웹 개발 종합반 1주차 TIL - 구글 폰트와 부트스트랩 잘 가져다 사용하기웹 개발 종합반 1주차 TIL - CSS 기초웹 개발 종합반 1주차 TIL -
taejudevlog.tistory.com
스파르타플릭스 상단 만들기
1. index.html 을 생성하고 부트스트랩 Jumbotron 추가하기
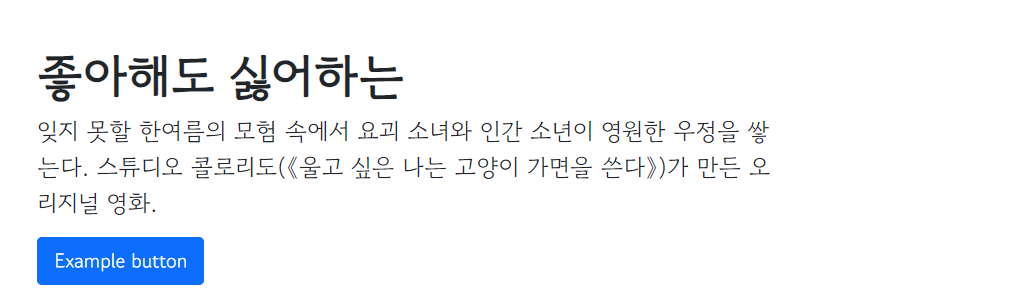
✓ 부트스트랩 사이트에서 Jumbotron 을 검색
✓ See our new Jumbotron example for a demo 클릭!
✓ F12를 누르고 개발자 도구를 열어 해당 부분을 Edit as HTML로 복사해 HTML body부분에 넣기
부트스트랩 점보트론 👇
Jumbotron example · Bootstrap v5.3
Add borders Or, keep it light and add a border for some added definition to the boundaries of your content. Be sure to look under the hood at the source HTML here as we've adjusted the alignment and sizing of both column's content for equal-height. Example
getbootstrap.com
!! 부트스트랩 CDN을 넣어야 제대로 부트스트랩을 사용 가능하다는 것 명심!
 <link
      href="https://cdn.jsdelivr.net/npm/bootstrap@5.0.2/dist/css/bootstrap.min.css"
      rel="stylesheet"
      integrity="sha384-EVSTQN3/azprG1Anm3QDgpJLIm9Nao0Yz1ztcQTwFspd3yD65VohhpuuCOmLASjC"
      crossorigin="anonymous"
 />

<script
      src="https://cdn.jsdelivr.net/npm/bootstrap@5.0.2/dist/js/bootstrap.bundle.min.js"
      integrity="sha384-MrcW6ZMFYlzcLA8Nl+NtUVF0sA7MsXsP1UyJoMp4YLEuNSfAP+JcXn/tWtIaxVXM"
      crossorigin="anonymous"
></script>
스파르타플릭스에 구글 폰트 적용하기
✓ 아래의 코드를 복사해서 head 태그 안에 <style></style> 태그를 안에 넣기 👇
@import url('<https://fonts.googleapis.com/css2?family=Gowun+Dodum&display=swap>');

 * {
     font-family: 'Gowun Dodum', sans-serif;
 }
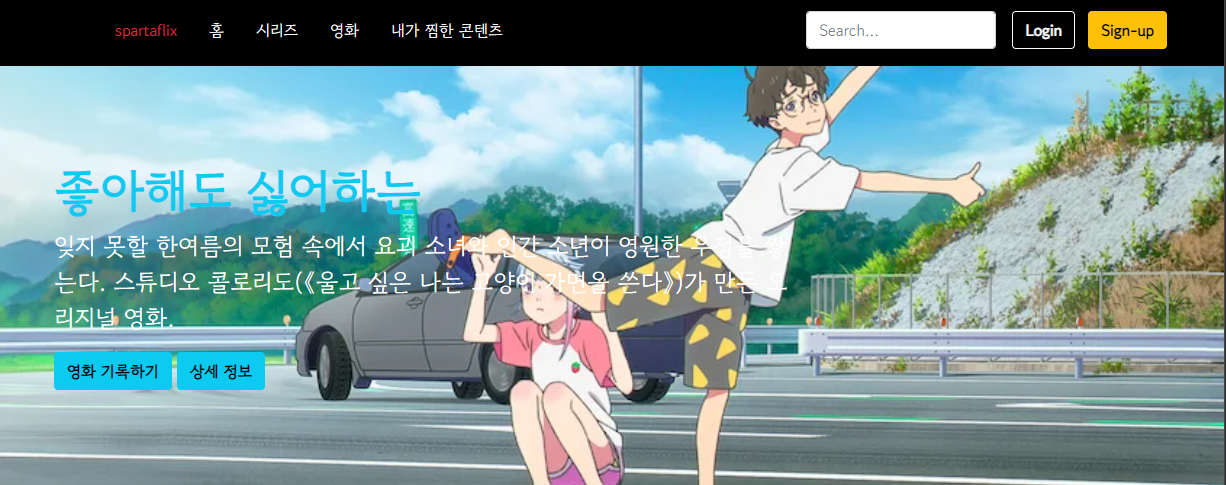
스파르타플릭스에 헤더 추가하기

✓ 부트스트랩 사이트에서 Examples - Headers 을 검색
✓ F12를 누르고 개발자 도구를 열어 해당 부분을 Edit as HTML로 복사해 HTML body 제일 윗 부분에 넣기
Headers · Bootstrap v5.3
getbootstrap.com
<header class="p-3 text-bg-dark">
    <div class="container">
     <div class="d-flex flex-wrap align-items-center justify-content-center justify-content-lg-start">
        <a href="/" class="d-flex align-items-center mb-2 mb-lg-0 text-white text-decoration-none">
          <svg class="bi me-2" width="40" height="32" role="img" aria-label="Bootstrap"><use xlink:href="#bootstrap"></use></svg>
        </a>

        <ul class="nav col-12 col-lg-auto me-lg-auto mb-2 justify-content-center mb-md-0">
            <li><a href="#" class="nav-link px-3 text-danger">spartaflix</a></li>
            <li><a href="#" class="nav-link px-3 text-white">홈</a></li>
            <li><a href="#" class="nav-link px-3 text-white">시리즈</a></li>
            <li><a href="#" class="nav-link px-3 text-white">영화</a></li>
            <li><a href="#" class="nav-link px-3 text-white">내가 찜한 콘텐츠</a></li>
        </ul>

        <form class="col-12 col-lg-auto mb-3 mb-lg-0 me-lg-3" role="search">
          <input type="search" class="form-control form-control-dark text-bg-dark" placeholder="Search..." aria-label="Search">
        </form>

        <div class="text-end">
          <button type="button" class="btn btn-outline-light me-2 fw-semibold"><span class="fw-bold">Login</span></button>
          <button type="button" class="btn btn-warning fw-semibold"><span class="fw-bold">Sign-up</span></button>
        </div>
      </div>
   </div>
 </header>
스파르타플릭스 배경 추가하고 상단 완성하기
background-image: url(https://occ-0-2218-988.1.nflxso.net/dnm/api/v6/E8vDc_W8CLv7-yMQu8KMEC7Rrr8/AAAABTptlvAxhxX43N0TFyjSWoi7Qi4KLctKczxz_M_kFeFgfIAvy6Uk2Xk6_-XCj-usQMakNzvyxkAesGqul_LSKef4ZG6cV5wBlGRX.webp?r=f50);
전체 상단 코드 👇
스파르타플릭스 상단 아래에 영화 카드 추가하기
✓ 부트스트랩 사이트에서 Cards - Grid Cards 를 찾기
✓ 코드 복사하고 header 밑에 <div></div> 생성해서 안에 코드 붙여넣기
부트스트랩 카드 👇
Cards
Bootstrap’s cards provide a flexible and extensible content container with multiple variants and options.
getbootstrap.com

✓ 카드 내용에 영화 제목, 별점 ⭐, 코멘트를 변경
카드까지 추가한 전체 코드 👇
스파르타플릭스 영화 포스팅 박스 만들기
1. 우선 큰 박스 mypostingbox 클래스 div 만들기
- 박스 너비 정하기 - width : 500px ;
- 박스 바깥쪽으로 띄우기 - margin : 30px auto 30px auto ;
- 안쪽으로 띄우기 - padding : 20px 20px 20px 20px ;
- 그림자 효과 - box-shadow : 0px 0px 3px 0px #747474 ;
- 박스 모서리 둥글게 변경 - border-radius : 5px ;
2. 앨범 이미지, 앨범 제목, 앨범 날짜를 입력할 수 있는 input, Textarea 태그 사용하기
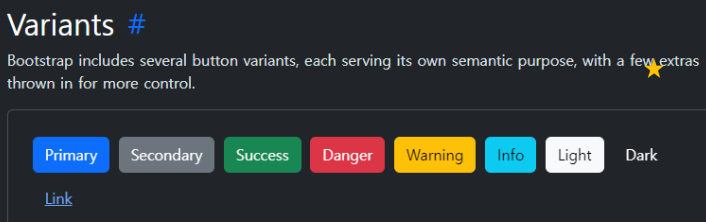
✓ 부트스트랩의 Forms 의 Floating Labels 와 Input group 의 Custom forms 참고
✓ 버튼은 부트스트랩의 Buttons 의 Variants 참고
Buttons
Use Bootstrap’s custom button styles for actions in forms, dialogs, and more with support for multiple sizes, states, and more.
getbootstrap.com
  .mypostingbox {
        width: 500px;
        margin: 30px auto 30px auto;
        padding: 20px 20px 20px 20px;
        border-radius: 5px;
        box-shadow: 0px 0px 3px 0px #747474;
  }


 <body>
    <div class="mypostingbox">
        <div class="form-floating mb-3">
            <input type="email" class="form-control" id="floatingInput" placeholder="영화 이미지 주소">
            <label for="floatingInput">영화 이미지 주소</label>
        </div>
        <div class="form-floating mb-3">
            <input type="email" class="form-control" id="floatingInput" placeholder="영화 제목">
            <label for="floatingInput">영화 제목</label>
        </div>
        <div class="input-group mb-3">
            <label class="input-group-text" for="inputGroupSelect01">별점</label>
            <select class="form-select">
                <option selected>별점선택</option>
                <option value="1">⭐</option>
                <option value="2">⭐⭐</option>
                <option value="3">⭐⭐⭐</option>
                <option value="4">⭐⭐⭐⭐</option>
                <option value="5">⭐⭐⭐⭐⭐</option>
            </select>
        </div>
        <div class="form-floating mb-3">
            <input type="email" class="form-control" id="floatingInput" placeholder="추천 이유">
            <label for="floatingInput">추천 이유</label>
        </div>
        <button type="button" class="btn btn-info">기록하기</button>
    </div>
 </body>
드디어 완성한 전체 완성 모습과 코드
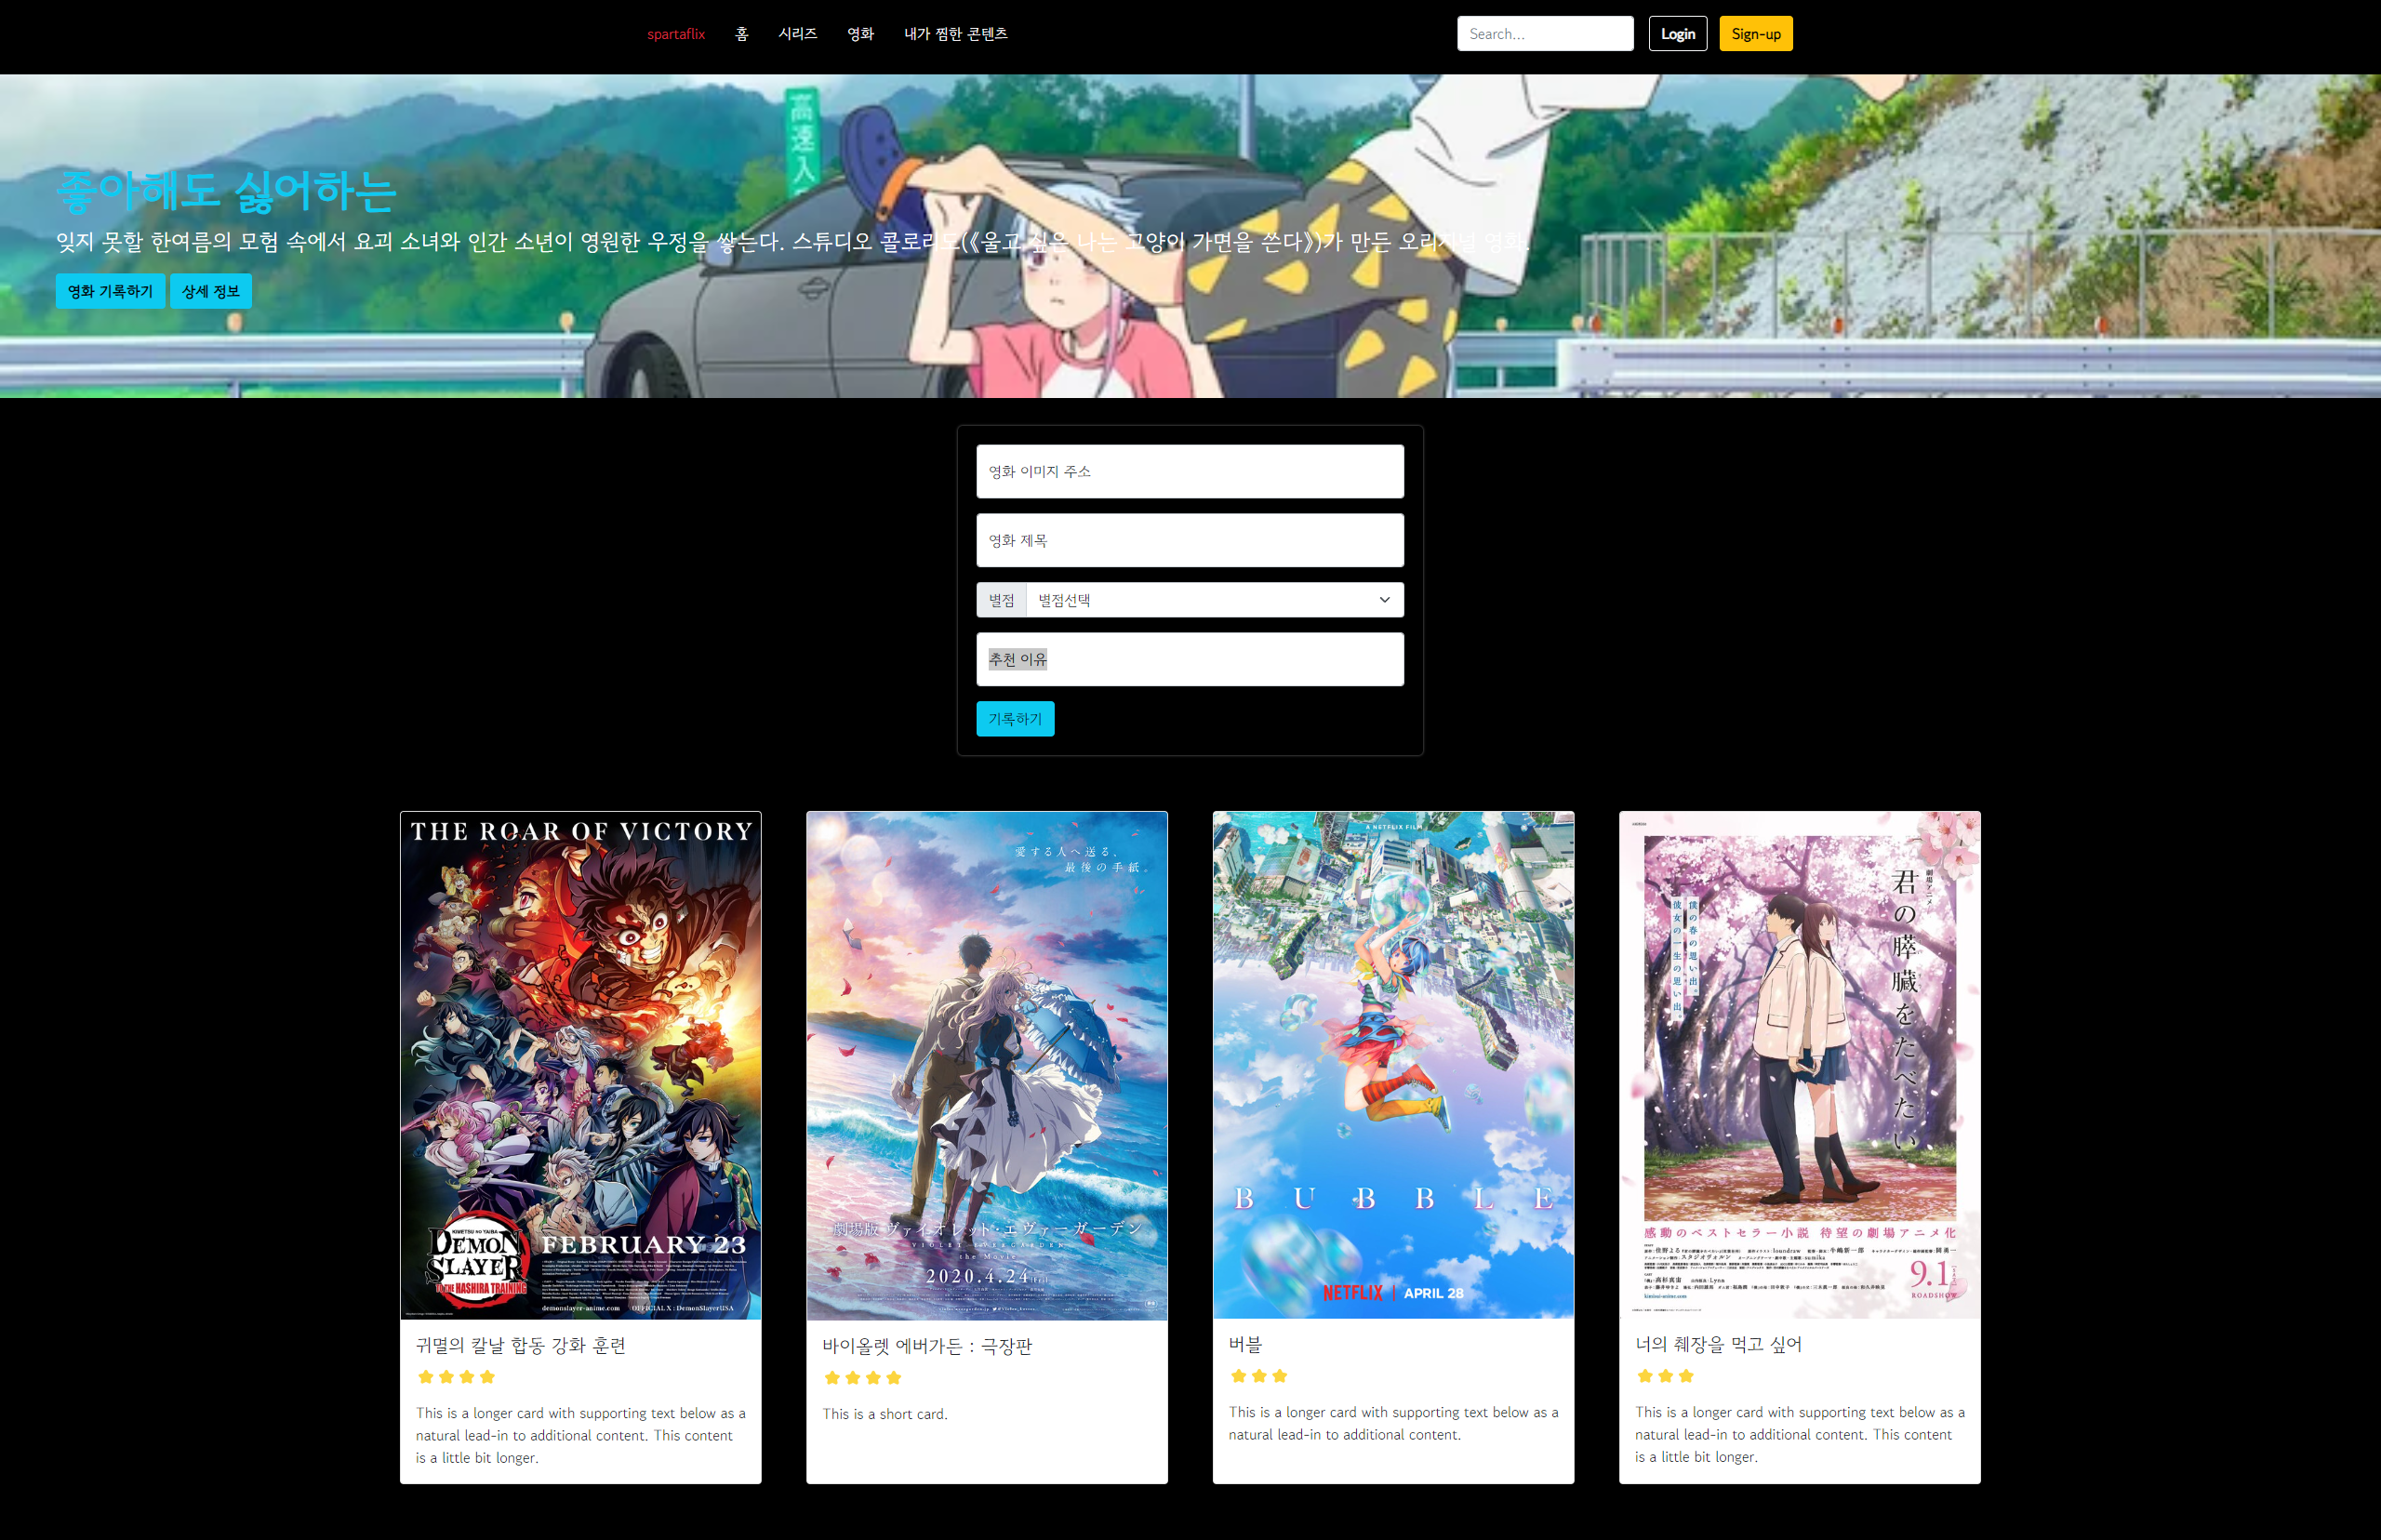
전체 완성 코드 👇
728x90
'내배캠_Java 6기 > 웹개발 종합반 강의' 카테고리의 다른 글
| 웹 개발 종합반 3주차 - 1주차 추억앨범 프로젝트에 Jquery 적용해보기 (4) | 2024.07.09 |
|---|---|
| 웹 개발 종합반 2주차 - 자바스크립트 개요와 기초 문법 (0) | 2024.07.05 |
| 웹 개발 종합반 1주차 - HTML, CSS, Bootstrap으로 추억앨범 만들기 2 (0) | 2024.07.04 |
| 웹 개발 종합반 1주차 - HTML, CSS, Bootstrap으로 추억앨범 만들기 1 (0) | 2024.07.03 |
| 웹 개발 종합반 1주차 TIL - 구글 폰트와 부트스트랩 잘 가져다 사용하기 (0) | 2024.07.03 |